Today I'm going to show you how to re-install RouterOS on to your Mikrotik RB3011 router to effectively start from scratch and return the router to the default factory settings. This process will work on other Mikrotik router models, but bear in mind I'm doing this "how to" document using the RB3011.
So why would you want to do this? Your router may be behaving unusually or having difficulty maintaining connectivity or saving changes. This normally means that there is some type of corruption and I think the best way to rectify these issues is to essentially re-install the OS.
This process will re-format the internal HDD storage and re-install the OS from an image you've downloaded from the Mikrotik download site. You're going to require the following to complete this project:
- Winbox which can be downloaded here...
- Netinstall which can be downloaded here...
- The RouterOS image you want to re-install onto your router which can be downloaded here...
- An Ethernet cable to connect from your computer to your router
- RJ45 to DB9 Cisco Console Cable if you wish to see the router boot. You can see how to set this up in a previous post here...
Before we begin, ensure that the computer you're going to use to do this exercise does not have any other network connections except the Ethernet port that you plan on connecting to your router. So ensure you aren't connected to your wireless network, 4G or Bluetooth because this can cause issues with the Netinstall client.
Now open Winbox and connect to your router as you would normally so we can backup your routers current configuration by using the following syntax within a terminal window in Winbox:
/export file=config
Download the resultant config.rsc file to your PC from the Winbox Files List window by dragging it to your desktop. This is essentially a backup of your routers configuration to save you having to re-apply all the current settings manually.
You're now ready to reset your router to the default configuration before we re-install the RouterOS via Netinstall. Within your Winbox window click System > Reset Configuration. Now follow the steps in the screen shot below:
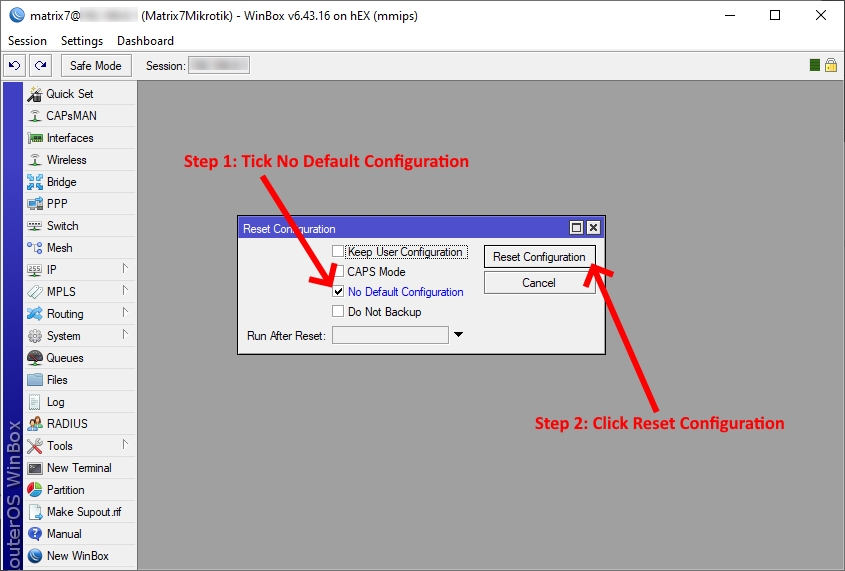
The router will reboot and will have no configuration applied to it. Now before we connect to it, we will need to apply an IP Address to the Ethernet adaptor on your computer so it's on the same network as your recently reset router. The router's default IP is 192.168.88.1 so we'll apply 192.168.88.10 to our NIC with a subnet of 255.255.255.0 (/24). Make the gateway and DNS the router's IP of 192.168.88.1.
Now plug your Ethernet cable from the computer to the RB3011 Ethernet 1 or ether1 port. Open Winbox and connect to the router using the IP of 192.168.88.1. From within Winbox, click New Terminal and paste the following syntax to set the router into Etherboot mode:
/system routerboard settings set boot-device=try-ethernet-once-then-nand
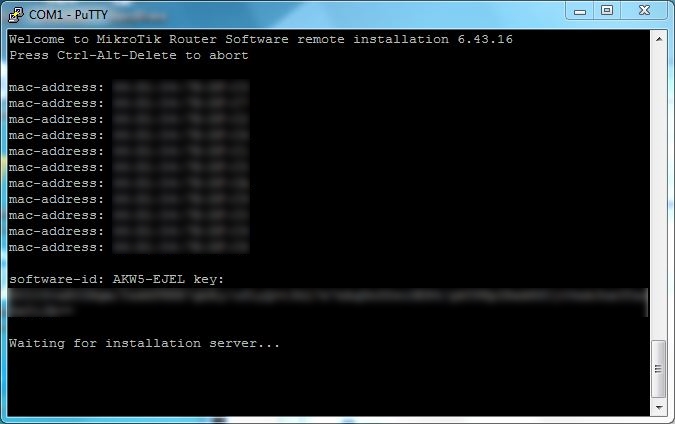
Once you've pasted the command above, reboot the router by using System > Reboot within Winbox and it will boot into Etherboot mode. If you've connected via the Serial Console after the router boots you should see something similar to the following screen:
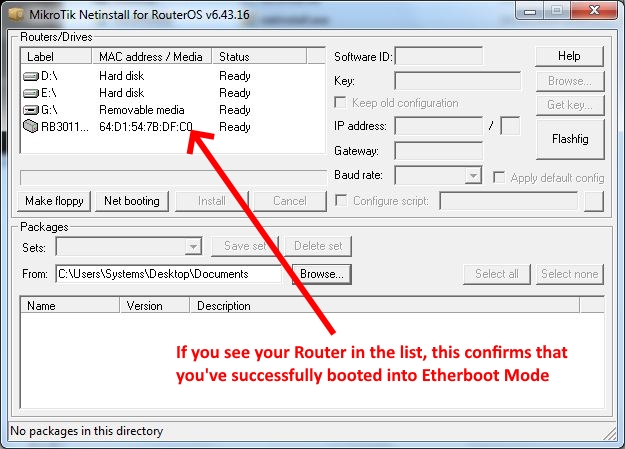
When you are in Etherboot Mode you can now open Netinstall.exe in admin mode (by right clicking and selecting Run as Administrator) to connect to the router in preparation of uploading and re-formatting the system to your preferred RouterOS image. When you've opened the Netwinstall.exe executable you will see the following screen:
In the screen shot below, follow the steps to commence the Formatting and Installation procedure:
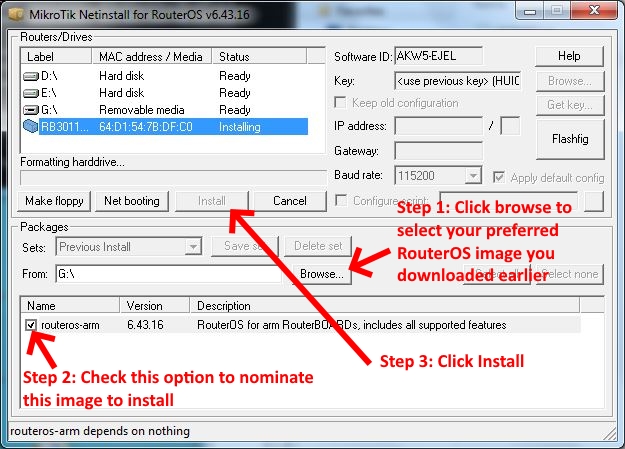
Once the procedure is complete, you should see the following image with a Status of "Waiting reboot":
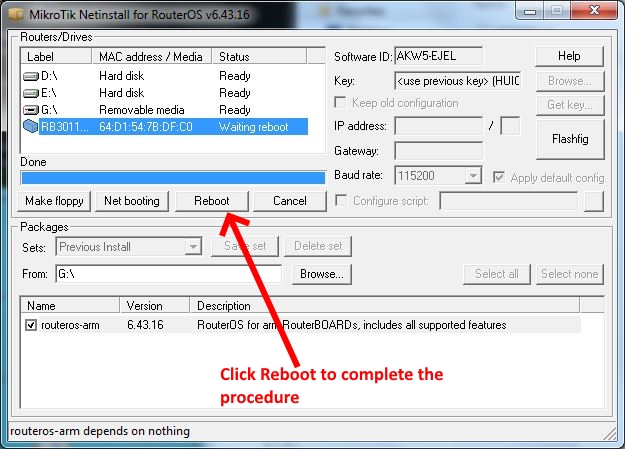
Once your router has rebooted you will have a freshly installed RouterOS as well as the default configurations. My recommendation is to clear the default configuration by connecting to your router with Winbox and selecting System > Reset Configuration. From the reset Configuration window, check the option "No Default Configuration" and then click the Reset Configuration button to apply and reboot.
Once rebooted, you can re-apply your backup script we saved at the beginning of this tutorial and you're done!
If you've found this useful, you may want to sign up to our newsletter where you'll receive notices on when we post new articles and helpful "how tos". Just fill out your details below and we'll do the rest...
Please leave comments and suggestions in the Comments section below...


4 Responses