Exchange Online PowerShell includes the Get-RecoverableItems and Restore-RecoverableItems cmdlets, which allow administrators to view and restore deleted items from a user's Recoverable Items folder. These cmdlets are typically used for data recovery scenarios, such as when a user permanently deletes emails, and the administrator needs to retrieve them.
Prerequisites
Permissions: Ensure you have the necessary permissions in Exchange Online. Typically, you need to be assigned the Mailbox Import Export role. This role isn't assigned by default, so you'll need to add it to a role group (like Organization Management) using the Exchange Admin Center or PowerShell.
There are two prerequisites you need before going through with this tutorial and they are:
- The ExchangeOnlineManagement module needs to be installed on your PC. If you haven't got this installed please follow the instructions on how to install it via the following link...
- The admin account you use to log onto your Microsoft Tenant requires the Mailbox Import Export role. Bear in mind, you can't add this role while you're logged onto the account directly, you'll need to log onto another admin account within your Tenant to add this role to your regular admin account. Follow the steps below outlined in the screenshots to add this role through the Exchange Admin portal here...
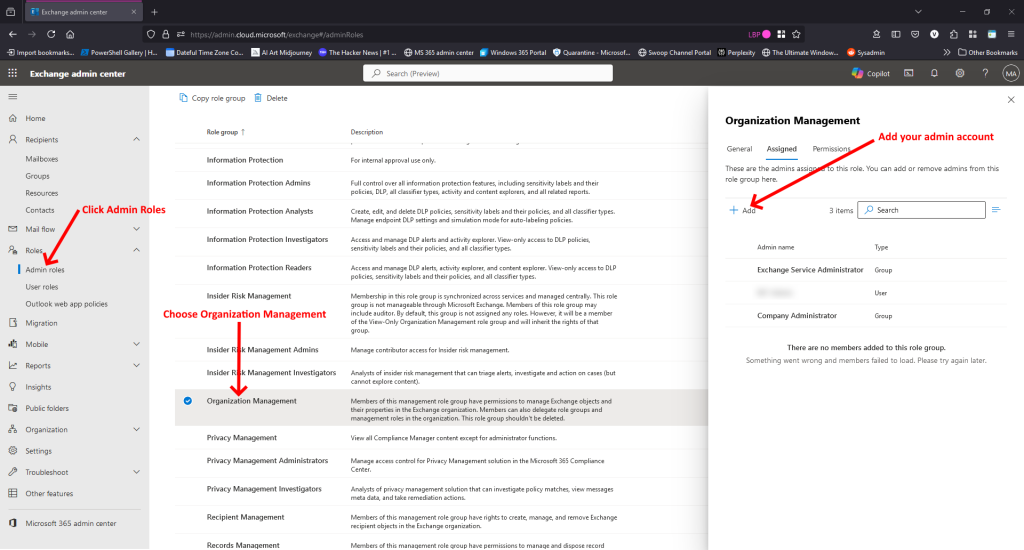
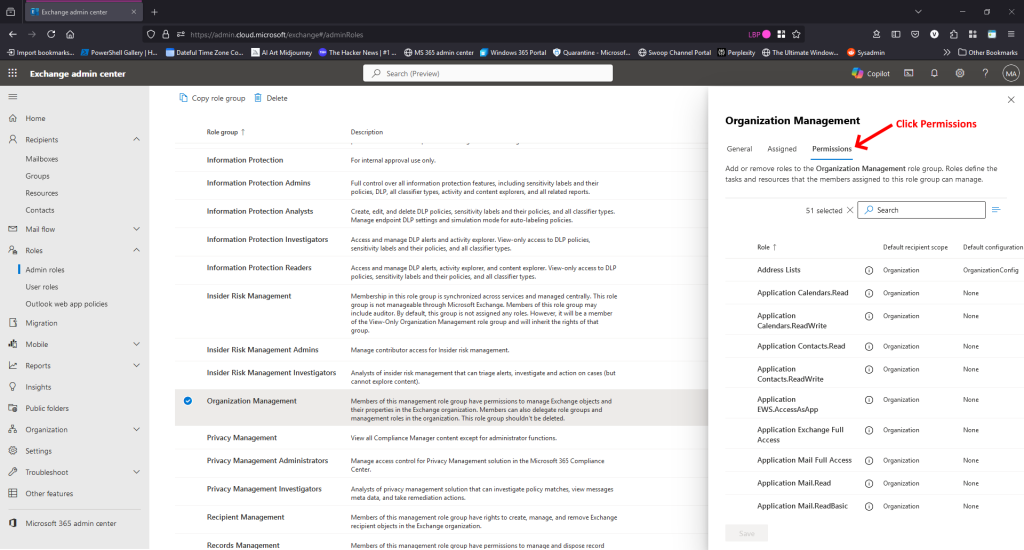
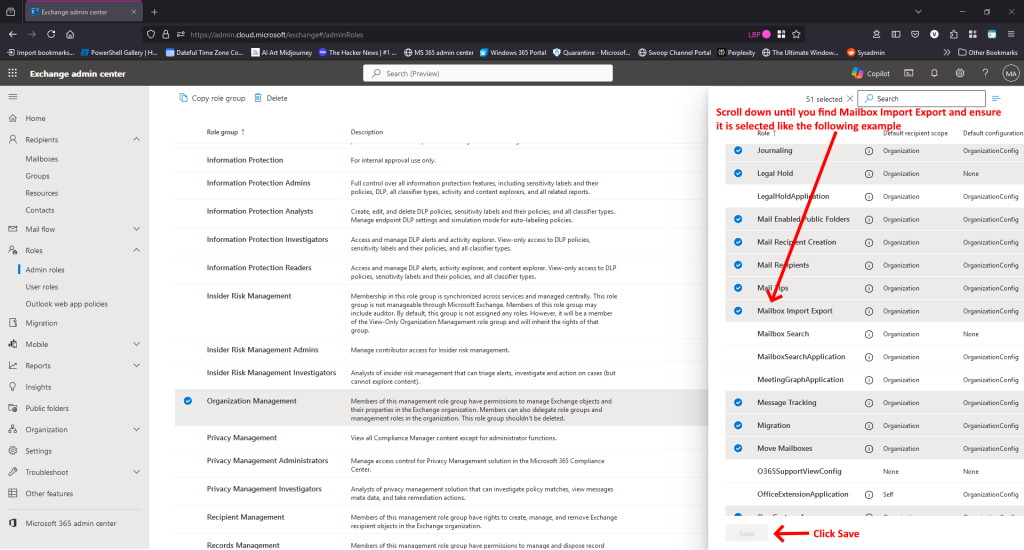
You're now ready to to commence your journey to recovering emails for your users. To start, simply open a PowerShell instance as an admin and follow the steps outlined below.
Use the following command to authenticate against your Microsoft Tenant:
Connect-ExchangeOnline -UserPrincipalName youradminaccount@ofyourmicrosofttenant.comIn the example above, change [email protected] to the admin account of your Microsoft Tenant with the necessary Mailbox Import Export role permissions. You'll prompted to provide your logon credentials and complete the 2FA challenge.
We can now use the Get-RecoverableItems cmdlet to first find the emails you're looking for and finally use Restore-RecoverableItems to restore the emails as required.
Get-RecoverableItems
This cmdlet retrieves items from the Recoverable Items folder of a mailbox. The folder includes subfolders like Deletions, Purges, and Versions.
Syntax
Get-RecoverableItems -Identity -FilterType -SourceFolder
Parameters Usage
-Identity -> The identity of the mailbox (e.g., email address or UPN)
-FilterType -> Specifies the type of items to retrieve (e.g., DeletedItems, PurgedItems, Versions, All)
-SourceFolder -> Specifies the subfolder (e.g., Deletions, Purges, or DiscoveryHolds)
-SubjectContains -> Specifies your nominated text within the Subject Line
Example 1: View all deleted items in the Deletions folder
The following example would display all the emails for the email [email protected] in the Deletions folder
Get-RecoverableItems -Identity theguy@thebigcheese.com.au -FilterType DeletedItems -SourceFolder DeletionsExample 2: Retrieve purged items
The following example would display all the emails for the email [email protected] in the Purges folder. This is when an item is marked to be purged from the mailbox database. This is also known as a store Hard Delete. More often than not, the users has used SHIFT+DELETE to delete the email. From memory, you only have 14 days to recover the email until it's permanently removed so this may not work for you if the time frame of the deleted emails is beyond 14 days.
Get-RecoverableItems -Identity theguy@thebigcheese.com.au -FilterType PurgedItems -SourceFolder PurgesExample 3: Retrieve emails with specific text within the Subject Field
The following example would be used to find all emails with a particular string (Being Awesome) within the Subject line:
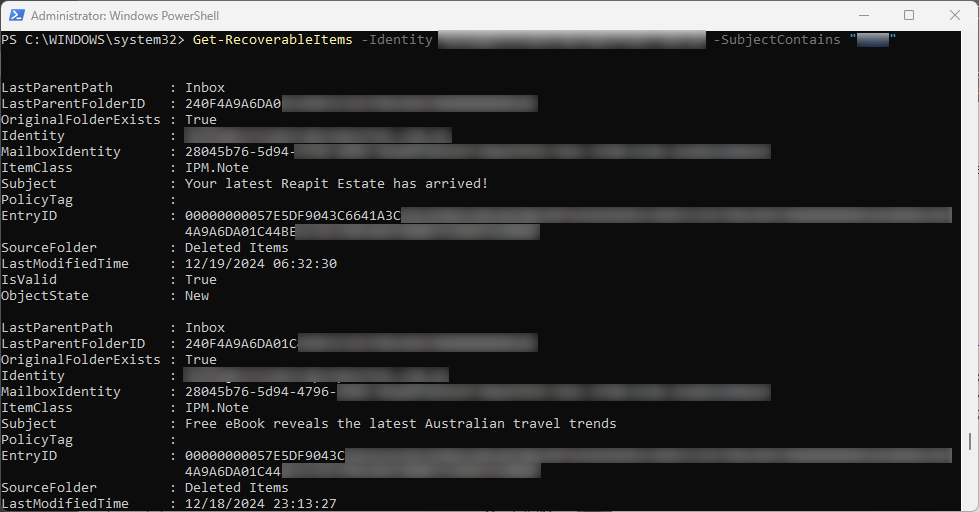
Get-RecoverableItems -Identity theguy@thebigcheese.com.au -SubjectContains "Being Awesome"When the search is complete the output looks like the following screenshot:
Restore-RecoverableItems
This cmdlet restores items from the Recoverable Items folder back to the user’s mailbox.
Syntax
Restore-RecoverableItems -Identity -SourceFolder [-SubjectContains ] [-StartDate ] [-EndDate ] [-All]
Parameters
-Identity: The identity of the mailbox.
-SourceFolder: Specifies the subfolder from which to restore items.
-SubjectContains: Filters items by a subject keyword.
-StartDate and -EndDate: Filters items by date range.
-All: Restores all items from the specified folder.
Example 1: Restore all items from the Deletions folder
The following example would restore all the emails for the email account [email protected] that are located in in the Deletions folder
Restore-RecoverableItems -Identity theguy@thebigcheese.com.au -SourceFolder Deletions -AllExample 2: Restore specific items based on the subject
The following example would restore all the emails for the email account [email protected] that that have Important Project in the Subject Line
Restore-RecoverableItems -Identity theguy@thebigcheese.com.au -SourceFolder Purges -SubjectContains "Important Project"Example 3: Restore items from a specific date range
The following example would restore all the emails for the email account [email protected] that that are from a specific date range from the Deletions folder
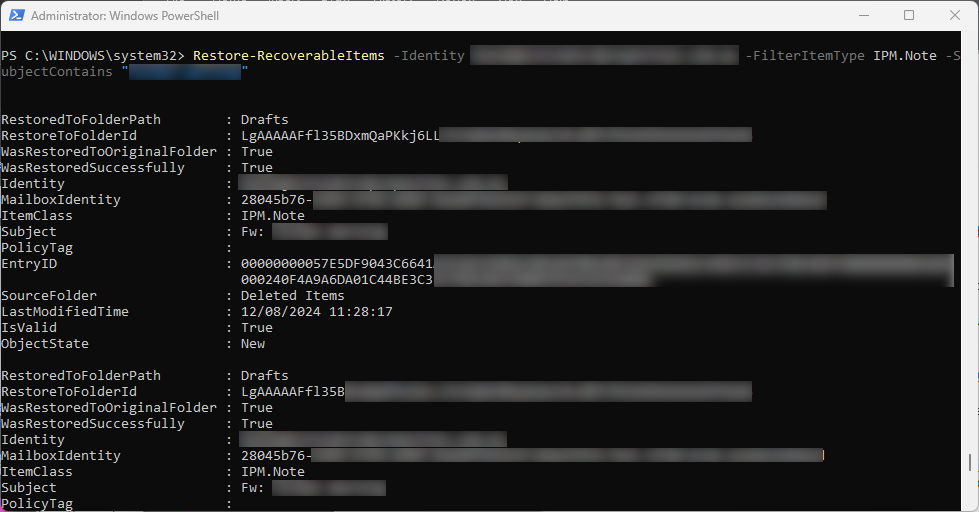
Restore-RecoverableItems -Identity theguy@thebigcheese.com.au -SourceFolder Deletions -StartDate "2023-12-01" -EndDate "2023-12-15"When the search for the emails is complete and emails have been restored to their original location the output looks like the following screenshot:
Key Points
Item Source Folders:
Deletions: Contains items deleted from the Deleted Items folder.
Purges: Contains items deleted from Deletions (permanently deleted items).
Filter Results: Use filtering parameters (e.g., -SubjectContains, -StartDate, -EndDate) to narrow down items for viewing or restoration.
Audit Restorations: After restoring items, confirm with the user to ensure the items appear in their mailbox.
By using these cmdlets, administrators can effectively manage the recovery and restoration of deleted items in Exchange Online.
If you've found this useful, you may want to sign up to our newsletter where you'll receive notices on when we post new articles and helpful "how tos". Just fill out your details below and we'll do the rest…


