


Setting up Windows Sandbox in Windows 11 is a reasonably straightforward process. Windows Sandbox provides a secure, isolated environment where you can run untrusted applications or browse unsafe content without risking your main system. Below is a step-by-step guide:
Prerequisites
Windows 11 Pro, Enterprise, or Education: Windows Sandbox is not available in the Home edition.
Hardware Virtualisation Support: Ensure your PC supports virtualization and it is enabled in the BIOS/UEFI. Look for settings like Intel VT-x, AMD-V, or SVM.
Confirm virtualization is enabled via Task Manager: Open Task Manager (Ctrl + Shift + Esc). Go to the Performance tab. Look for "Virtualization" under the CPU section as outlined in the following screenshot:

Step 1: Enable Windows Sandbox
Open Windows Features: Press Win + R, type optionalfeatures, and press Enter.
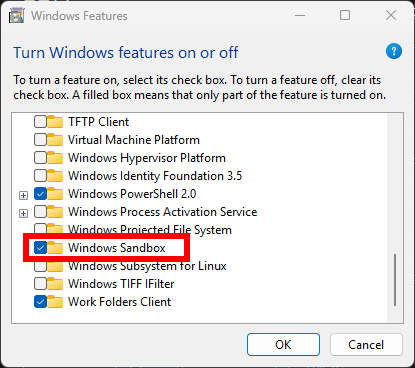
Enable Windows Sandbox: In the Windows Features dialog box, scroll down and locate Windows Sandbox. Check the box next to Windows Sandbox (see screenshot below). Click OK and wait for Windows to apply the changes. Restart your computer when prompted.
Step 2: Launch Windows Sandbox
Search for Sandbox: Press Win + S, type Windows Sandbox, and press Enter.
Run as Administrator: Right-click on Windows Sandbox and select Run as Administrator if you require elevated privileges.
Allow Permissions: If prompted by User Account Control (UAC), click Yes to allow.
Step 3: Using Windows Sandbox
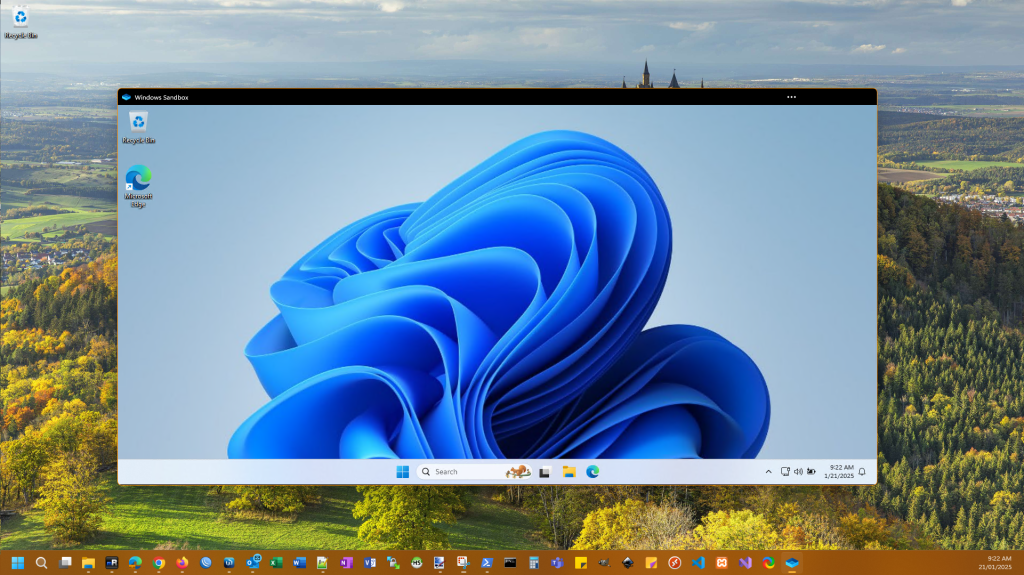
The Windows Sandbox environment will open as a fresh, clean installation of Windows 11 in a small RDP session. You can use it like a regular desktop to install applications, test scripts, or browse unsafe websites without affecting your main system. Your sandbox instance will look like the following screenshot:
Here’s what you can do in the Windows Sandbox environment:
Install and Test Software: Copy the installer or files you want to test into the Sandbox by dragging them from your host machine. Run or install the application as needed and see what impact the software has on the sandbox environment to determine if it's malicious or not.
Browse Safely: Use the built-in browser in the Sandbox to visit websites without risking your main system.
Experiment with Configurations: Test scripts, commands, or settings in a safe, disposable environment.
Step 4: End a Windows Sandbox Session
When you're done: Close the Sandbox window. You’ll see a prompt confirming that everything within the Sandbox will be discarded. Click OK. The environment is reset to its default clean state, and all changes are permanently deleted.
Additional Notes
Files Persistence: Files and changes in the Sandbox are not saved once the session is closed. If you need to keep files, copy and save them to your host system before exiting.
Network Access: Windows Sandbox has access to the internet through the host system’s network connection. Be mindful of how you use this feature.
Performance Impact: Windows Sandbox uses your system's resources (CPU, memory, and storage). Ensure your PC meets the following hardware requirements for optimal performance:
Processor: Minimum 2 cores (4 or more recommended for better performance).
Memory: At least 4 GB (8 GB or more recommended).
Storage: 1 GB of free disk space for the sandbox.
Troubleshooting
Windows Sandbox Option Missing: Verify you’re using Windows 11 Pro, Enterprise, or Education. Confirm virtualization is enabled in BIOS/UEFI. Run the following command in PowerShell to ensure Hyper-V is enabled:
DISM /Online /Enable-Feature /FeatureName:"Containers-DisposableClientVM" /AllPerformance Issues:
Check that your system meets the hardware requirements.Close unnecessary applications on your host system to free up resources.
With these steps, you should have Windows Sandbox set up and ready to use on your Windows 11 system.
If you've found this useful, you may want to sign up to our newsletter where you'll receive notices on when we post new articles and helpful "how tos". Just fill out your details below and we'll do the rest…


