There are millions of sites showing you how to install PHP 5 on IIS and believe me, most of those don't work. I have decided to do my own succinct version of PHP 5 and IIS so here it is. Hopefully it helps someone.
This guide assumes you already have IIS up and running on your server.
- Download PHP 5 from http://www.php.net/downloads.php You'll need the PHP 5.X.X zip package and also the PECL 5.X.X Win32 binaries
- Extract the PHP 5.X.X zip package to C:\PHP5. You could save it anywhere, but this is just simpler
- Extract the PECL 5.X.X Win32 binaries package to C:\PHP5\ext
- Within the C:\PHP5 folder create 3 sub folders called log, sessions and upload
- Within the C:\PHP5\log folder create an empty text file called php.log
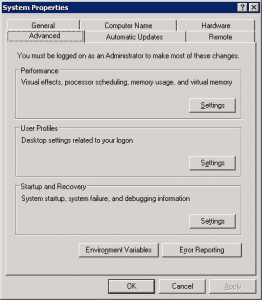
- Right click on the My Computer and click properties. Select the Advanced tab and then click the Environment Variables button at the bottom.
Once the Environment Variables window is open highlight the "Path" option in the list and click Edit
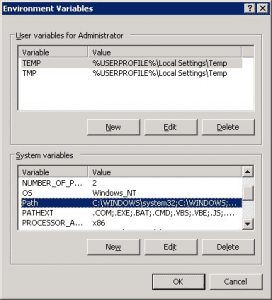
- Move your cursor to the end of the text in the Variable value field and type in the path to the PHP directory you created earlier C:\PHP5. Make sure that there is a semi colon ";". Click on the Ok button to save it and return to the Environment Variables window.
- From the Environment Variables window click the New button and you should see the New System Variable window. In the Variable name field type in PHPRC, and in the Variable value field type in the path to your PHP install directory C:\PHP5. Click the ok button to create and save the variable. This PHPRC variable tells Windows where to look for your php.ini file.
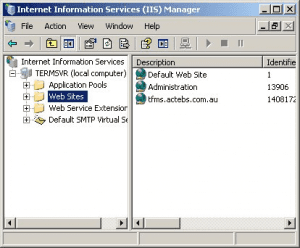
- Open IIS and right click on the Web Sites folder and click Properties
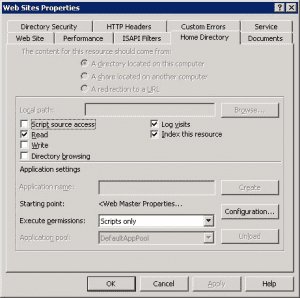
- Click the Configuration button
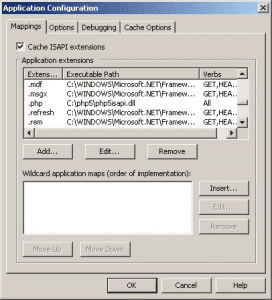
- Click the Add button
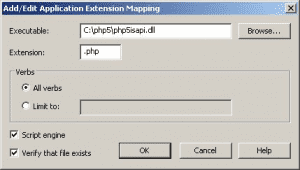
- In the Extension field enter .php and then click on the browse button and navigate to the php5isapi.dll file from inside your PHP installation folder C:\PHP5
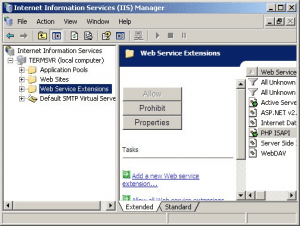
- Click on the Web Service Extensions folder in IIS MMC and then click Add a new Web service extension option in the right pane
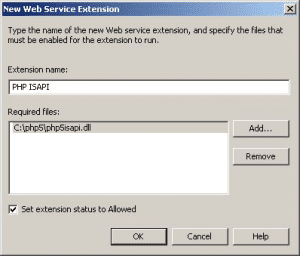
- Now in the New Web Extension window in Extension name field put in a descriptive name, such as PHP ISAPI. Click Add and in the Add file window click the Browse button and navigate to C:\PHP5 and select the php5isapi.dll file. Make sure the Set extension status to Allowed option is checked and then click the OK button
- Now to configure your php.ini file.
- Open your folder C:\PHP5 and copy php.ini-recommended and rename the copy to php.ini
- Open php.ini in your favourite text editor and do a search for extension_dir = "./" and overwrite it with extension_dir = "C:\PHP5\ext"
- Search for ;session.save_path = "/tmp" and replace it with session.save_path = "C:\PHP5\sessions" make sure you uncomment by removing the semi colon ";"
- Search for ;upload_tmp_dir = and replace it with upload_tmp_dir = "C:\PHP5\upload" make sure you uncomment by removing the semi colon ";"
- Search for ;error_log = filename and replace with error_log = "C:\PHP5\log\php.log" make sure you uncomment by removing the semi colon ";"
- Search for ;extension=php_mysql.dll and make sure you uncomment by removing the semi colon ";"
- Now restart IIS by opening a command prompt and type in iisreset
You have now successfully installed PHP 5 on IIS 6. Consider yourself a GOD!
If you've found this useful, you may want to sign up to our newsletter where you'll receive notices on when we post new articles and helpful "how tos". Just fill out your details below and we'll do the rest...


